Feeding hummingbirds is one of the simplest joys in a backyard, and also one of the easiest things to get quietly wrong in ways that harm the very birds you are trying to help. The good news is that everything you need to do it well fits on a single page. Make the nectar correctly, choose and place a feeder sensibly, and keep it clean, and you will have healthy, returning hummingbirds with very little effort. Here is the whole thing, start to finish.
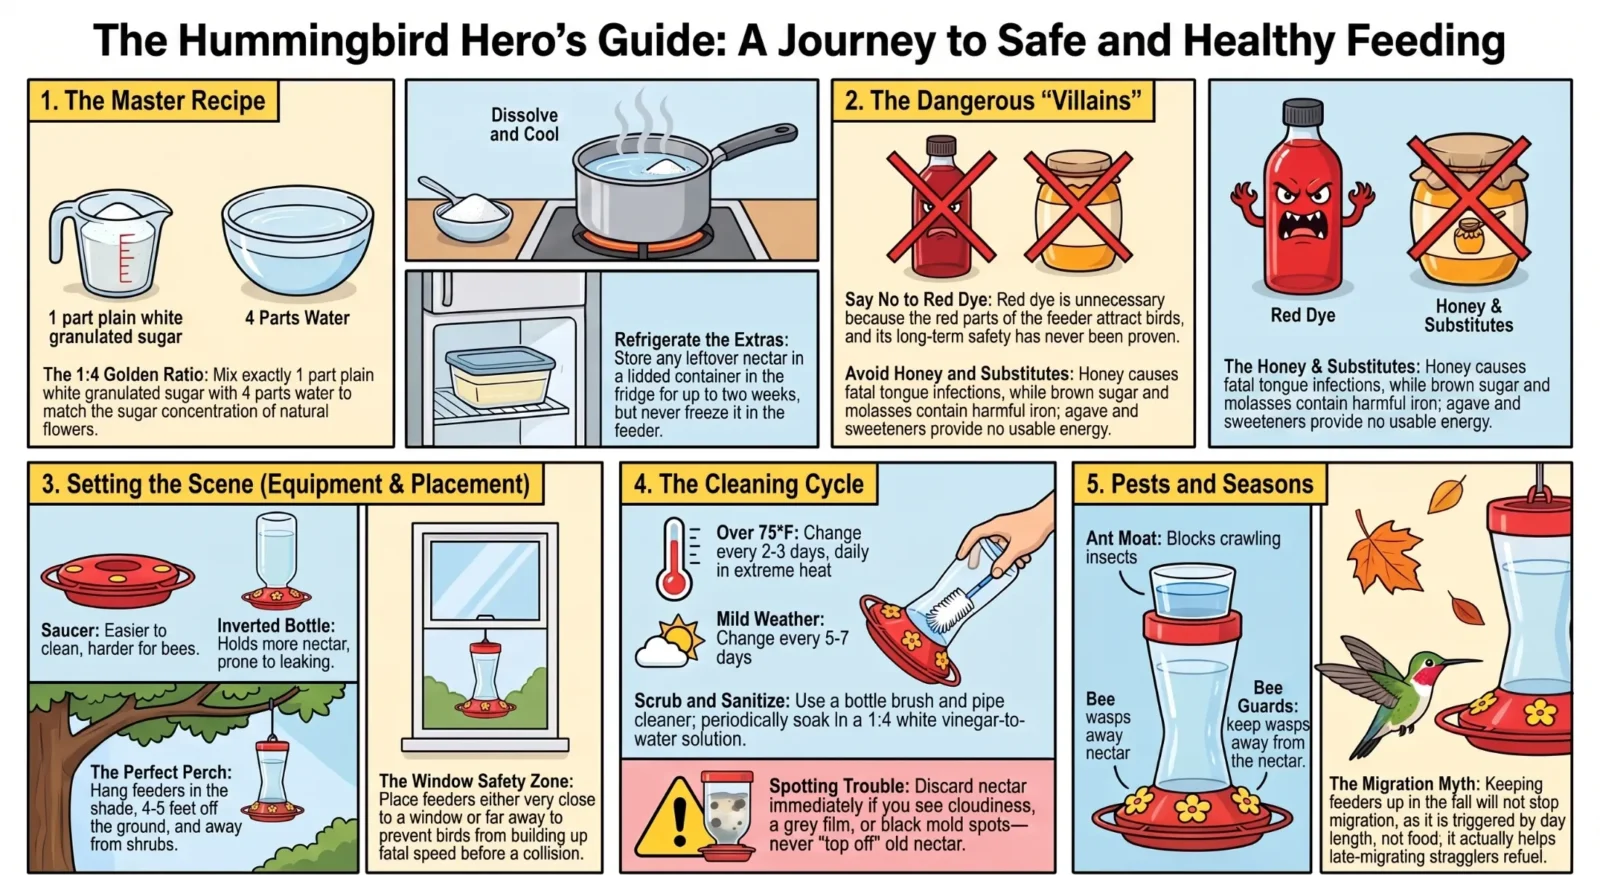
The Hummingbird Nectar Recipe
You need exactly two ingredients, and nothing else.
Ingredients
- 1 part plain white granulated sugar
- 4 parts water
Method
- Heat the water until it is hot, which helps the sugar dissolve. You do not need to boil it.
- Stir in the sugar until it is completely dissolved and the mixture is clear.
- Let the nectar cool to room temperature before filling the feeder.
- Fill a clean feeder with only as much as the birds will use in a few days, and refrigerate any extra.
That one-part-sugar to four-parts-water ratio is not arbitrary. It produces a sugar concentration very close to the natural flower nectar hummingbirds prefer, which is why they take to it so readily. The reasoning behind that concentration, and the rest of what a hummingbird actually eats, is covered separately.
What to Never Put in Nectar
Just as important as what goes in is what stays out. Each of the following is either useless or actively dangerous:
- Red dye. Unnecessary, because the red parts of the feeder already attract birds, and its safety for hummingbirds has never been established.
- Honey. Ferments quickly and promotes the fungal growth behind the fatal tongue infections that afflict hummingbirds.
- Brown sugar, raw sugar, and molasses. Contain iron and other compounds that can harm hummingbirds in the quantities they consume.
- Powdered sugar. Contains cornstarch or other anti-caking agents.
- Agave, and artificial sweeteners. Provide no usable energy, which for a bird living on the edge of its energy budget is its own kind of danger.
Plain white sugar, cane or beet, dissolved in water is the only safe recipe. Anything else is a gamble with a bird’s life.
Adjusting the Ratio
The standard 1:4 mix is right for nearly all conditions. During a cold snap or in very early spring, when arriving migrants need extra energy and few flowers are open, you may strengthen it to 1:3 for a short stretch, then return to 1:4. Do not go sweeter than 1:3. Nectar that is too concentrated is harder for hummingbirds to process and does not match what their bodies expect.
Strengthening the mix is the only adjustment worth making. Never add anything that is not sugar, in any season or for any reason.
Storing Nectar
If you make a larger batch, store the extra in a lidded container in the refrigerator for up to two weeks, and always serve it at room temperature. One tempting shortcut to avoid: do not freeze nectar in the feeder to keep it cool, since ice crystals can clog the feeding ports and damage the feeder. Make it ahead, keep it in the fridge, and refill from there.
Choosing a Feeder
Feeders come in two broad designs, and the difference matters more for you than for the birds.
Saucer (dish) feeders hold the nectar in a shallow basin with feeding ports on top. They are the easier choice: simple to take fully apart, quick to clean, less prone to leaking, and harder for bees to reach the nectar. For most people they are the better pick.
Inverted bottle feeders hold a reservoir of nectar above the ports. They hold more and are the familiar hanging shape, but they can drip in the heat, and the drips draw ants and bees, while the narrow ports are harder to clean thoroughly.
Whichever style you choose, the single most useful feature is the ability to come completely apart for cleaning. Glass reservoirs are easier to sanitize and last longer than plastic. Look for built-in bee guards, and skip anything with fussy crevices you cannot reach with a brush. You do not need a feeder that dispenses colored nectar; the red on the feeder itself is all the lure required.
Where to Place Your Feeder
Placement affects both how safe the feeder is and how long the nectar lasts.
- In the shade. Nectar spoils far faster in sun and heat, so a shaded spot under a tree or eave keeps it fresh longer.
- About four to five feet off the ground, high enough to be out of easy reach of cats and other ground predators.
- Away from reflective glass. Position feeders either very close to a window, within about three feet, or well away from it, more than about thirty feet, never at the middle distance where a startled bird can build up fatal speed. The full reasoning, along with the rest of your yard’s hazards, is covered separately.
- In the open, away from shrubs and ledges a cat could hide behind.
- Spread several feeders apart rather than clustering them. Hummingbirds are fiercely territorial, and spacing feeders out reduces the fighting that erupts when one bird can guard everything at once.
- Not beside a known nest, which invites stress and unwanted attention.
Keeping the Feeder Clean
This is the part that separates helping hummingbirds from harming them. A neglected feeder grows fungus and bacteria that cause fatal disease, so a dirty feeder is genuinely worse than no feeder at all. The diseases themselves, and how to recognize a sick bird, are covered on their own page. Preventing them comes down to a simple routine.
Change the nectar on schedule, by temperature:
- In hot weather, above about 75°F (24°C), every two to three days, and daily in extreme heat.
- In mild weather, every five to seven days.
- Any time you see cloudy nectar, a grey film, or black spots, discard it immediately.
Never “top off” a feeder by adding fresh nectar to old. Always empty it completely first.
To clean it:
- Take the feeder fully apart.
- Wash every part in hot water with a bottle brush, and use a pipe cleaner or small brush to clear the ports where mold hides.
- Periodically sanitize by soaking the parts for about an hour in a white vinegar solution, roughly one part vinegar to four parts water, then scrub.
- For stubborn black mold, a dilute bleach solution works. Use no more than one part bleach to nine parts water, soak for about ten minutes, then rinse extraordinarily thoroughly, since bleach residue can cause mouth lesions.
- Rinse everything well and let it air dry before refilling.
Never mix bleach and vinegar, or bleach with any other cleaner. Combining them releases chlorine gas, which is dangerous to you as well as to the birds. Choose one method, rinse well, and let everything dry.
Avoid scented or dyed dish soaps, whose residues and fragrances can linger. And replace any feeder that has developed cracks or cloudy, degraded plastic, roughly every couple of years.
If you do find a bird at your feeder that seems sick, weak, or unable to fly, take the feeder down and clean it, and see our guide on what to do with an injured or grounded hummingbird before intervening.
Bees, Ants, and Wasps
Sugar water attracts more than hummingbirds. Ants are best stopped with an ant moat, a small water-filled cup that hangs above the feeder and forms a barrier they cannot cross. For bees and wasps, choose a saucer feeder or one with built-in bee guards that keep insects away from the nectar, and avoid feeders that drip. If insects become overwhelming, move the feeder a short distance; the hummingbirds will follow, and the insects often will not.
Winter Feeding
In most of North America hummingbirds leave for the winter. Along the mild Pacific coast, from California up into British Columbia, Anna’s Hummingbirds now stay year-round, and in parts of the Southwest and Gulf Coast some birds remain too.
If you have overwintering birds, a feeder genuinely helps them through cold snaps, because a hummingbird spends a freezing night in torpor and wakes with almost no fuel in reserve. The problem is that the nectar freezes. Never add anything to the nectar to lower its freezing point.
For practical methods, from rotating two feeders to purpose-made warmers, see our guide to keeping a feeder going through a Northwest winter, which covers the region where this comes up most.
When to Put Feeders Out and Take Them Down
Put feeders out in early spring, a week or two before hummingbirds typically arrive in your area, so they are waiting when the first birds appear. In fall, a common worry is that leaving a feeder up will tempt hummingbirds to delay migrating. It will not. Migration is triggered by the shortening day length, not by food availability, so a feeder does not hold birds back.
In fact, leaving it up a little longer helps late migrants and stragglers refuel. Because arrival and departure timing is really a migration question, the details live in our guide to when to put feeders out and take them down.
Feeding Varies by Region
Almost everything on this page has a local dimension. Nectar spoils in a day in a Phoenix July and lasts a week on the Oregon coast. Arrival dates differ by two months between the Gulf Coast and northern Maine. Some regions take feeders down in October and others never take them down at all.
For local timing, species, and planting, see our regional guides to the Pacific Northwest, the Southwest, the Southeast, the Northeast and Midwest, California, and the Rocky Mountains.
Frequently Asked Questions
What is the correct hummingbird nectar recipe?
One part plain white sugar dissolved in four parts water, with nothing else added. No dye, no honey, no substitutes.
Do I need to boil the water?
No. Hot water helps the sugar dissolve and can slightly slow spoilage, but boiling is optional. Always cool the nectar to room temperature before filling the feeder.
How often should I change the nectar?
Every two to three days in hot weather and daily in extreme heat, or every five to seven days in mild weather. Discard it at the first sign of cloudiness or mold.
Why is red dye bad for hummingbirds?
It serves no purpose, since the feeder’s red parts already attract birds, and its safety has never been proven. There is no reason to use it.
Can I use bleach to clean my feeder?
Yes, for stubborn mold, at no more than one part bleach to nine parts water, soaked for about ten minutes and rinsed extraordinarily well. Never mix bleach with vinegar or any other cleaner, because the combination releases chlorine gas.
Where is the best place to hang a feeder?
In the shade, about four to five feet up, away from reflective windows and out of reach of cats, with multiple feeders spaced apart to reduce territorial fighting.
Will leaving my feeder up in fall stop hummingbirds from migrating?
No. Migration is triggered by day length, not food. Leaving a feeder up actually helps late migrants refuel on their way through.
Conclusion
Feeding hummingbirds well is genuinely easy once you know the handful of things that matter: the two-ingredient recipe, a clean feeder placed thoughtfully, and a cleaning routine you actually keep. Do those, and a feeder becomes exactly what it should be, a reliable, safe source of energy that brings these remarkable birds back to your yard day after day, season after season.
A feeder works best as a supplement rather than the whole story. Planting for hummingbirds gives them nectar on their own terms, and the insects they need for protein, which no feeder can provide.
Quiz: Nectar & Feeders: Are You Doing It Right?
The quiz questions are grounded in ornithological and expert feeding-care guidance. Key references are listed below:
Audubon’s own guidance: a 1:4 solution of refined white sugar to water, no red coloring, never brown sugar, honey, molasses or artificial sweeteners, refrigerated storage brought to room temperature before refilling, and cleaning every day or every other day in hot weather.
Explains that it is the flowers rather than the nectar that are brightly coloured, which is why feeders are built with red parts, and that the two things that matter most in choosing a feeder are how easily it comes apart for cleaning and how large it is. Also the source for a disinfecting solution no stronger than one part bleach to nine parts water, with thorough rinsing and drying.
Practical guidance on feeder selection, placement and maintenance, including why leaving feeders up in autumn does not delay migration.
Source for the four-parts-water to one-part-sugar rule of thumb and why it approximates natural flower nectar, along with feeder material and design considerations and dealing with ants and wasps.
The recipe from Smithsonian bird ecologist Brian Evans and nutritionist Erin Kendrick: one part refined white sugar to four parts water, no red dye, with feeders changed and cleaned regularly to prevent mold.
Covers common feeder problems including mould, the use of ant moats, and why feeders are worth maintaining into September as birds build fat reserves for migration.
Federal overview of North American hummingbird species, their diets and the nectar sources they rely on, providing the biological context for what a feeder is supplementing.